Container Configuration
Fine-tune your container with environment variables, resource limits, and advanced settings.
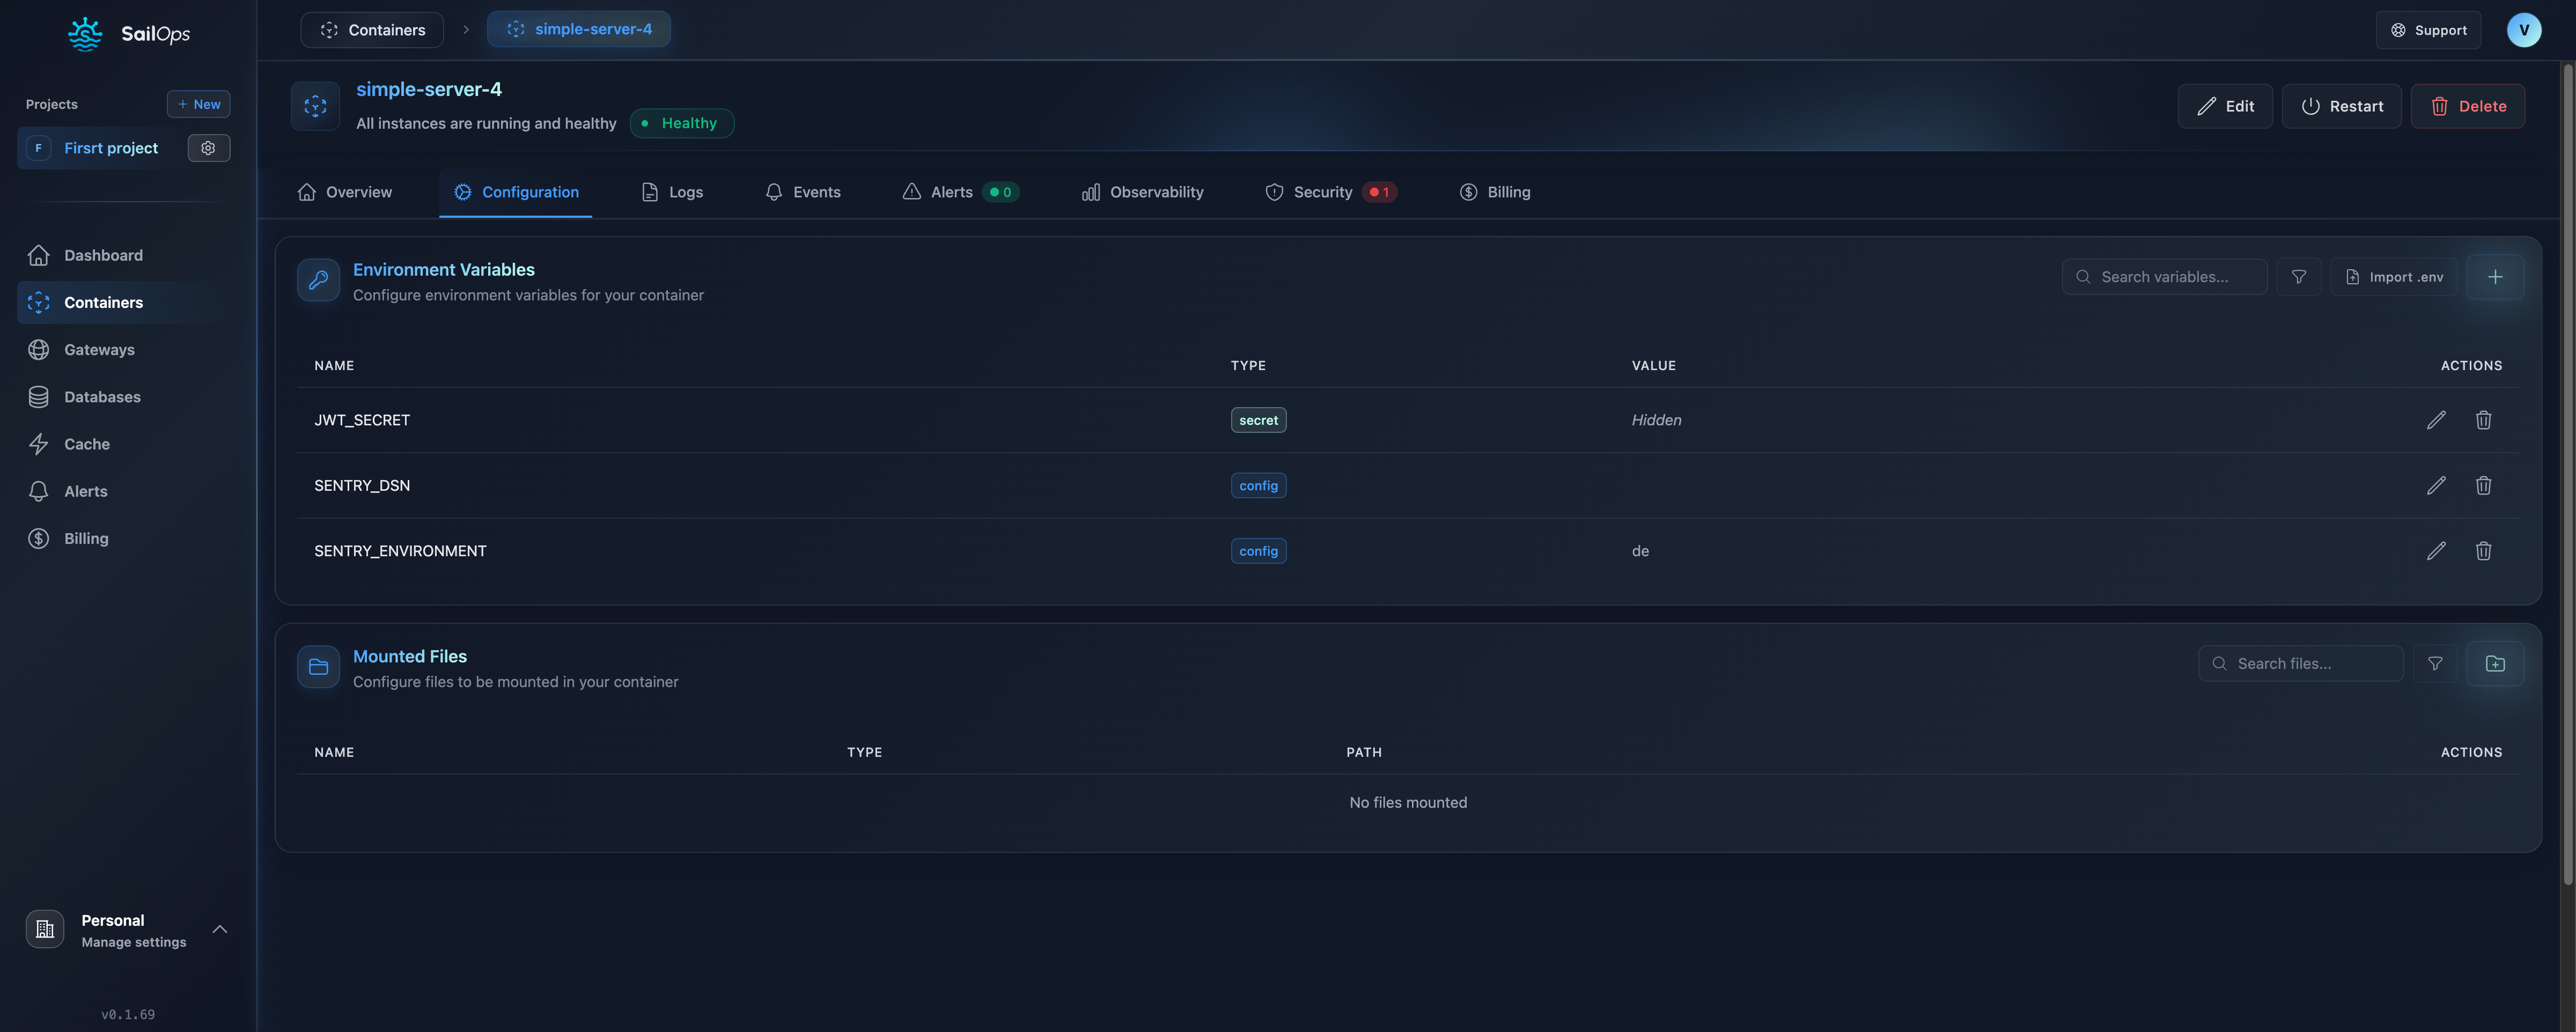
Environment Variables
Environment variables are the primary way to configure your containers.
Adding Variables
- Go to your container
- Click the Configuration tab
- Under Environment Variables, click Add Variable
- Enter the key and value
- Click Save
Changes are saved immediately, but running instances keep their current configuration. A Restart required banner appears at the top of the page — click Restart on the container to apply the new configuration. Starting a stopped container or saving its deployment settings (image, resources…) also applies it.
Variable Types
| Type | Use Case | Example |
|---|---|---|
| Plain | Non-sensitive config | NODE_ENV=production |
| Secret | Sensitive data | API_KEY=sk-xxxxx |
Toggle the "Secret" option to mask values in the UI. Secret values are encrypted at rest and never exposed in logs.
Common Variables
| Variable | Description |
|---|---|
PORT | Application listening port |
NODE_ENV | Node.js environment |
DATABASE_URL | Database connection string |
REDIS_URL | Cache connection string |
LOG_LEVEL | Logging verbosity |
Referencing Other Resources
Use internal DNS for database and cache connections. The format is {service-name}.{namespace}:
# PostgreSQL (service-name.namespace)
DATABASE_URL=postgresql://user:[email protected]:5432/dbname

# Valkey/Redis (service-name.namespace)
REDIS_URL=redis://my-cache.my-project-abc123:6379
The namespace is automatically assigned to your project. You can find it in your project settings or resource details.
Injected Variables
The Configuration tab shows a read-only Injected Variables section when your container or job has active service connections or managed observability enabled. These variables are managed by SailOps and cannot be edited manually — they update automatically when you add, modify, or remove a connection.
Mounted Files
Mount configuration files directly into your container's filesystem.
Adding a Mounted File
- Go to your container
- Click the Configuration tab
- Under Mounted Files, click Add File
- Configure the file:
- Name: Identifier for the file (e.g.,
config-json,htpasswd) - Path: Mount path inside the container (e.g.,
/app/config.json) - Type:
config(plain) orsecret(encrypted at rest) - Content: File contents
- Name: Identifier for the file (e.g.,
- Click Save
Editing a mounted file
The files table shows the content of config files directly and masks secret file content.
When you edit an existing secret file, the Name and Type fields are locked because the stored content is keyed by name. To change the path, edit the file and update only the Path field — leave the content field empty to keep the current content. To replace the content, type the new value in the content field. If you need to rename a secret file, delete it and mount a new one.
File name rules
| Constraint | Rule |
|---|---|
| Allowed characters | Lowercase letters, digits, and - |
| Start / end | Must start and end with a letter or digit |
| Maximum length | 56 characters |
| Uniqueness | Must be unique within the container |
| Pattern | ^[a-z0-9]([-a-z0-9]*[a-z0-9])?$ (RFC 1123 label) |
The file name is used to build the Kubernetes volume name (config- or secret- prefix + file name). Names that do not follow these rules are rejected before the deployment is submitted.
Container Isolation
All containers on SailOps benefit from strong isolation by default. Each container runs in a fully isolated environment, protecting it from other containers and the host system.
This isolation is automatic and requires no configuration. It also means containers can safely run as root if needed.
Resource Configuration
Compute Class
Change compute resources anytime:
- Go to your container
- Click Edit
- Select a new compute class
- Click Save
Changes apply with zero downtime via rolling update.
Resource Limits
SailOps automatically sets resource limits based on your compute class. Each class has a fixed CPU:RAM ratio, and you configure resources using sliders within the class limits.
| Class | CPU:RAM Ratio | Max CPU | Max RAM |
|---|---|---|---|
| Eco | 1:2 | 3 cores | 6 GB |
| Standard | 1:4 | 15 cores | 58 GB |
| Spot | 1:4 | 15 cores | 58 GB |
| Production | 1:4 | 6 cores | 28 GB |
| Prod. Compute | 1:2 | 6 cores | 16 GB |
| Prod. Memory | 1:8 | 6 cores | 58 GB |
| ARM | 1:4 | 8 cores | 32 GB |
Example resources for Standard class (1:4 ratio):
| CPU | Memory |
|---|---|
| 1 vCPU | 4 GB |
| 2 vCPU | 8 GB |
| 4 vCPU | 16 GB |
| 8 vCPU | 32 GB |
If your application exceeds the memory limit, it will be killed (OOMKilled). Monitor memory usage and upgrade if needed.
Each compute class enforces maximum CPU and RAM values. Requests that exceed the class maximum are rejected with a validation error. To use more resources, switch to a class with higher limits.
The Spot class offers the same resource limits as Standard but at a reduced cost with no SLA guarantees. Workloads may be interrupted when resources are needed by higher-priority workloads.
GPU Compute Classes
GPU compute classes are designed for AI/ML workloads, rendering, and other GPU-intensive tasks. Each GPU class enforces minimum CPU and RAM requirements to ensure optimal GPU performance.
| Class | GPU Model | GPU Mode | GPU Memory | Description |
|---|---|---|---|---|
| gpu-l4 | NVIDIA L4 | Dedicated | 24 GB | General-purpose GPU for AI inference |
| gpu-h100-mig-small | NVIDIA H100 | MIG 1g.10gb | 10 GB | H100 MIG slice for development/testing |
| gpu-h100-mig-medium | NVIDIA H100 | MIG 2g.20gb | 20 GB | H100 MIG slice for small workloads |
| gpu-l40s | NVIDIA L40S | Dedicated | 48 GB | High-memory GPU for large models |
| gpu-h100 | NVIDIA H100 | Dedicated | 80 GB | Top-tier GPU for training and inference |
Some GPU classes require BUSINESS or CUSTOM support plans. Check your organization's plan before deploying GPU workloads.
When using GPU classes, additional metrics (GPU utilization and GPU memory usage) appear in the Metrics tab for monitoring your GPU workloads.
Persistent Volumes
Attach durable storage to your container for data that must persist across restarts and redeployments (e.g., SQLite databases, file uploads, disk caches). Two storage classes are available: Standard (5K IOPS) for general workloads and Performance (15K IOPS) for I/O-intensive applications.
See the dedicated Persistent Volumes guide for full configuration details, storage classes, limitations, and best practices.
Port Configuration
Exposed Ports
Configure which ports your container exposes:
| Field | Description |
|---|---|
| Port | Internal container port |
| Protocol | TCP (default) or UDP |
Multiple Ports
You can expose multiple ports from a single container:
| Port | Protocol | Purpose |
|---|---|---|
| 3000 | TCP | API |
| 3001 | TCP | WebSocket |
| 9090 | TCP | Metrics |
Each port can be routed via a Gateway.
Health Checks
Configure health checks to ensure your container is healthy:
HTTP Health Check
| Parameter | Value |
|---|---|
| Type | HTTP |
| Path | /health |
| Port | 3000 |
| Interval | 30s |
| Timeout | 5s |
| Success Threshold | 1 |
| Failure Threshold | 3 |
TCP Health Check
For non-HTTP services:
| Parameter | Value |
|---|---|
| Type | TCP |
| Port | 5432 |
| Interval | 30s |
| Timeout | 5s |
Best Practices
- Keep health check endpoints lightweight
- Return 200 status for healthy, 5xx for unhealthy
- Include dependency checks (database connectivity)
- Don't perform heavy computations in health checks
Example health endpoint (Node.js):
app.get('/health', async (req, res) => {
  try {
    await db.query('SELECT 1');
    res.status(200).json({ status: 'healthy' });
  } catch (error) {
    res.status(503).json({ status: 'unhealthy' });
  }
});
Startup Configuration
Container Command
Override the default startup command in the Container Command field within Basic Configuration. Enter the complete command as you would type it in a terminal — the system handles parsing.
nginx -g 'daemon off;'
/bin/sh -c 'echo hello && sleep 5'
node server.js --port 3000
Leave empty to use the command defined in your container image.
Security Context (Optional)
Security context settings are optional on SailOps. Thanks to strong container isolation, containers can safely run as root without additional configuration.
When to Configure Security Context
| Use Case | Security Context Needed? |
|---|---|
| Standard applications | No - isolation is sufficient |
| Legacy apps requiring root | No - root is safe |
| Compliance requirements | Yes - enables audit controls |
| Defense in depth | Yes - adds application-level restrictions |
Available Settings
When you set RunAsUser and/or RunAsGroup, the following restrictions are automatically applied:
| Setting | Description |
|---|---|
| Run As User ID | Numeric UID (e.g., 1000) |
| Run As Group ID | Numeric GID (e.g., 1000) |
| Read-Only Filesystem | Enabled automatically when UID/GID set |
| Non-Root Enforcement | Enabled automatically when UID/GID set |
Configuring Security Context
- Go to your container
- Click Edit or access Advanced Settings
- Navigate to Security Context
- Enter User ID and/or Group ID
- Save changes
If your application needs root access or you don't have compliance requirements, leave these fields empty. Container isolation is sufficient for security.
Labels and Annotations
Add metadata to your containers:
| Label | Value |
|---|---|
| app | api |
| environment | production |
| team | backend |
Labels are useful for:
- Filtering in the UI
- Organization
- Cost allocation
Restart Policy
Containers automatically restart on failure:
| Policy | Behavior |
|---|---|
| Always | Always restart (default) |
| OnFailure | Restart only on non-zero exit |
| Never | Never restart automatically |
Configuration Examples
Production API Server
| Parameter | Value |
|---|---|
| Name | api-prod |
| Image | myapp/api:v1.2.3 |
| Compute Class | Standard |
| CPU | 2 vCPU |
| Memory | 8 GB (auto-calculated from 1:4 ratio) |
| Replicas | 3 |
Environment variables:
| Variable | Value |
|---|---|
| NODE_ENV | production |
| PORT | 3000 |
| DATABASE_URL | postgresql://... |
| REDIS_URL | redis://... |
| LOG_LEVEL | info |
Health check: HTTP on /health:3000 every 15s
Labels: app=api, environment=production
Background Worker
| Parameter | Value |
|---|---|
| Name | worker |
| Image | myapp/worker:v1.2.3 |
| Compute Class | Eco |
| CPU | 1 vCPU |
| Memory | 2 GB (auto-calculated from 1:2 ratio) |
| Replicas | 2 |
Environment variables:
| Variable | Value |
|---|---|
| QUEUE_URL | redis://... |
| CONCURRENCY | 5 |
Health check: TCP on port 9000
Scheduled Job
| Parameter | Value |
|---|---|
| Name | cron-job |
| Image | myapp/cron:latest |
| Compute Class | Eco |
| CPU | 0.5 vCPU |
| Memory | 1 GB (auto-calculated from 1:2 ratio) |
| Replicas | 1 |
Environment variables:
| Variable | Value |
|---|---|
| SCHEDULE | 0 * * * * |
Best Practices
Environment-Specific Config
Use different values per environment:
# Development
DATABASE_URL=postgresql://localhost:5432/dev

# Production (using internal DNS: service-name.namespace)
DATABASE_URL=postgresql://prod-db.my-project-abc123:5432/prod
Twelve-Factor App
Follow the twelve-factor methodology:
- Store config in environment variables
- Keep development and production as similar as possible
- Treat backing services as attached resources
Secret Management
- Never commit secrets to version control
- Use environment variables for secrets
- Rotate secrets regularly
- Use different secrets per environment
Troubleshooting
Configuration Not Applied
- Configuration changes are not applied automatically — you must restart the container manually
- After saving, a Restart required banner confirms that the configuration was updated
- Check the Events tab for update status
- Verify the configuration was saved
OOMKilled
- Your container exceeded memory limits
- Upgrade to a larger compute class
- Optimize your application's memory usage
CrashLoopBackOff
- Container keeps crashing
- Check Logs for error messages
- Verify environment variables
- Ensure health check is correct